How to Protect Your Web Page Images
Techniques to Prevent Web Page Images From Being Stolen
 By
By The Issue
Web page images, whether they be in JPG, GIF, or PNG format are easy for end users to steal. Stealing these images involves nothing more difficult than right-clicking on an image and choosing "Save Target As" from the contextual menu that appears, or simply mouse dragging an image onto the desktop. The ease with which images can be lifted off of Web pages may be a boon to Web users, but it's also very frustrating to Web developers who want to protect the images on their websites. In this article I describe several techniques to thwart Web page image theft, but please understand that no technique is 100% effective. There are ways to get around these techniques; as developers all we can do is make image theft more difficult.
Techniques
Using Cascading Style Sheets
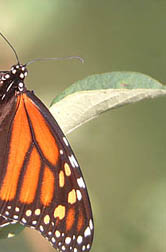
Setting an image as the background of a <div> element in CSS affords a measure of protection to an image. For example, the image below is actually a background of a <div> element.
The code for setting the background image of the above <div> looks like this:
div.monarch-background {
background-image: url(monarch.jpg);
background-repeat: no-repeat;
width: 400px;
height: 300px;
margin: 16px auto;
}
The pertinent parts of the above style rules are the background-image property, which has been set to monarch.jpg (the name of the image file), the background-repeat property, which has been set to no-repeat, and the width and height of the containing <div> element, which are the same as the width and height of the monarch.jpg image. Using this method makes mouse dragging the image onto the desktop impossible. Try it. However, a user can still right click on the image and choose "Save Background As" (or a similar command) from the contextual menu that appears and save the image to their computer. Therefore, this method provides limited protection.
Using JavaScript
JavaScript can be used to deter right clicking on an image, as well as mouse dragging an image onto the desktop. The image below has a bit of JavaScript attached to it that activates when the image is clicked on. Try it. If JavaScript is enabled in your browser a dialog box will pop up that says "This image is copyrighted!".

The JavaScript code for this script looks like this:
function protect()
{
alert("This image is copyrighted!");
return false;
}
The function "protect()" is activated when a user clicks on the image. The "return false;" part of the script cancels the user action and prevents the image from being stolen (but see the next paragraph). The code can be placed in an external JavaScript file, in the head of the document, or even directly inside the <img> tag, e.g.:
<img src="monarch.jpg" class="monarch" onmousedown="alert('This image is copyrighted!'); return false;" />
The effectiveness of this technique varies from browser to browser. For example, in Internet Explorer left clicking or right clicking the image will result in the above mentioned dialog box appearing and the action being cancelled. In Opera, left-clicking or right-clicking the image will still result in the dialog box appearing, but on right-clicking the contextual menu also appears, so the user can still save the image to their computer. And if JavaScript is disabled the script won't work at all. Also, touching the image on a touchscreen device such as an iPad causes a contextual menu to appear that lets a user save the image.
Using jQuery
jQuery can also be used to disable the contextual menu for an image, as well as prevent an image from being dragged onto the desktop. jQuery is a freely available JavaScript library that simplifies writing JavaScript. The image below has a bit of jQuery code attached to it that activates when the image is clicked on. Try left-clicking and right-clicking it. If JavaScript is enabled you won't be able to drag the image onto your desktop and the context menu won't appear (but see the second paragraph below).
Here's the jQuery code:
$("img.monarch").bind
("contextmenu", function(e) {
return false;
});
$("img.monarch").mousedown
(function(e) {
return false;
});
This code works consistently on all five browsers that I've tested it on (Firefox, Opera, Chrome, Internet Explorer, and SlimBrowser) and will probably work on all browsers that can render JavaScript. If JavaScript is disabled however the code won't work at all since jQuery is based on JavaScript. Also, and like the JavaScript example above, touching the image on a touchscreen device causes a contextual menu to appear that lets a user save the image.
Using Image Slicing and Cascading Style Sheets
Image slicing refers to cutting an image into pieces with an image editing program such as Photoshop. The several images can then be pieced back together using Cascading Style Sheets or html tables. For example, the apparent single image below is actually made up of 3 different images that have been put back together using CSS and divs. Move your mouse across the image (or touch the image if you are using a touchscreen device) to locate the 3 different parts.


The HTML for piecing together the above image looks like this:
<div class="monarch-container">
<div class="monarch1">
<img src="monarch-part1.jpg" alt="Monarch, Part 1" class="part1" />
<img src="monarch-part2.jpg" alt="Monarch, Part 2" class="part2" />
</div>
<div class="monarch2">
<img src="monarch-part3.jpg" alt="Monarch, Part 3" class="part3" />
</div>
</div>
And the CSS looks like this:
div.monarch-container {
width: 400px;
height: 300px;
margin: 16px auto;
}
div.monarch1 {
width: 400px;
height: 252px;
}
div.monarch1 img {
float: left;
}
div.monarch2 {
width: 400px;
height: 48px;
}
img.part1 {
width: 234px;
height: 252px;
}
img.part2 {
width: 166px;
height: 252px;
}
img.part3 {
width: 400px;
height: 48px;
}
The code for this technique is fairly complicated but the gist is to get the pieces into <div> elements. The <float> property is used to force the 2 images in the top <div> together.
The advantage of this technique is that a user can only save the pieces of a sliced image. Give it a try. If you save each image in the above example you'll end up with 3 separate images on your computer. Sure, it's possible to then piece the saved images back together with an image editing program, but this is a lot of trouble to go through.
The disadvantage of this technique is that it's difficult and time-consuming to implement. An image has to be cut up and then reassembled using divs or html tables, which is no easy task.
Adding a Copyright Symbol
A copyright symbol can be written on an image using an image editing program such as Photoshop, like the example below.

Adding a copyright symbol won't prevent image theft but it may make a would-be thief think twice about stealing your images. Personally, I don't care for this method because I don't like the way it looks, so I don't use it.
Conclusion
The ease with which images can be lifted off of Web pages is a frustrating reality for Web developers. However, the techniques described in this article afford a measure of protection to Web page images, but remember that determined individuals can get around them. No technique is 100% effective.